The ‘Where To Look’ Method.

To determine the altitude and azimuth of a celestial body, we could make calculations by using mathematical formulae; we could compute them with the aid of sight reduction tables; we could use star globes and star charts or we could use computer software.  However, all of these procedures only tell us what the altitude and azimuth of the chosen body would be at our assumed position which is only an approximate position.  The only way that we can determine the altitude and azimuth of a celestial body at our true position is by making accurate measurements with a sextant and an azimuth-compass or similar equipment.  However, before we can do this, we must obviously be able to locate the body in the sky.

The ‘Where To Look’ Method enables us to quickly and easily calculate which stars and planets will be above our horizon at the time that we wish to make a ‘fix’.  It is quite a useful method, especially in the cramped confines of a chart-table, in a rough sea.

It is emphasised that this is not intended to be a method of accurately pin-pointing the position of a star or planet but a simple and quick method of establishing whether or not the body is likely to be visible at the time an observation is required and if so, what its approximate position will be in the sky.

The following extract is taken from ‘Astronomy for Astro Navigation’ which is a companion book to ‘Astro Navigation Demystified’.

 Method.  To find if a star or planet will be above the horizon at our position at the time of the planned observations, we need to take two things into account, its local hour angle and its declination.

 Local Hour Angle (LHA).  For a star or planet to be visible, its meridian must be within 90o east or west of our estimated longitude at the time of the planned observations.

  • If a body’s LHA is greater than 0o and less than 90o or if LHA is greater than 360o and LHA – 360o is less than 90o then body will be above the western celestial horizon.
  • If a body’s LHA is greater than 270o but less than 360o then 360o – LHA will be less than 90o and the body will be above the eastern horizon.

We can formulate the above statements as follows:

Body is above western horizon if:  LHA = 0o TO 90o or LHA – 360o = 0o TO 90o

Body is above eastern horizon if:  LHA = 270o to 360o or 360o – LHA = 0o TO 90o

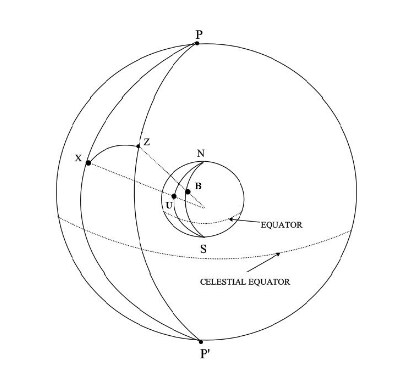
In the following example, we have plotted the positions of stars X and Y in terms of their LHA and declination which are as follows:

Star X: LHA 22o, Dec. 65oN   Star Y: LHA 295oE, Dec. 20oN.

azimuth X and Y


Point O is the position of an observer on the Earth’s surface at latitude 50oN.

NS is the meridian of the observer and in terms of LHA is 0o.

WE is the celestial equator.

The limits of the observer’s western and eastern horizons are at LHA 90o and LHA 270o which are both 90o from the observer’s meridian.

Since the LHAs of these bodies is either less than 90o or greater 270o, they will be visible above the horizon.

Bodies whose LHAs are greater than 90o but less than 270o would be below the celestial horizon and therefore would not be visible.

To Calculate Azimuth.  Once we have ascertained the LHA and declination of a celestial body, we can make a rough approximation of the azimuth by plotting the LHA and declination in relation to the observer’s assumed position on the azimuth diagram.

If we join the positions of X and Y to the position of the observer, we will see that the approximate azimuths are as follows:

X: Approximate Azimuth = N30oW   Y : Approximate Azimuth = N110oE

The full procedures for making these calculations is shown in detail in the books Astronomy for Astro Navigation and Astro Navigation Demystified.

Declination.  To ascertain whether or not a celestial body will be above the horizon, we have to take into account its declination as well as its LHA.  To be visible above the horizon, its declination must be within 90o of the latitude of our position.  If our latitude is north, then the declination must be within the range 90o north to (90o – latitude) south.  If the latitude is south, then the declination must be within the range 90o south to (90o – latitude) north.We can formulate the above statements as follows:

Latitude North:  visible range = 90oN to (90o – Lat)S.

Latitude South:   visible range = 90oS to (90o – Lat)N.

We can explain the reason for this rule with the aid of another diagram which shows the declinations of the celestial bodies X, Y together with a third body, planet V.  Please note that the diagram is for illustrative purposes only; for this reason, it is not drawn to scale and angles are not drawn accurately.

declination visible horizon

Summary of data relating to stars X and Y and planet V which are represented in the diagram:

Assumed Position of observer:  Lat. 50oN  Long. 135oW

Star X:   Declination = 65oN   LHA = 22o

Star Y:  Declination = 20oN   LHA = 295o

Planet V:  Declination = 10oS   LHA = 190o

O is the position of the observer at latitude 50oN and Z is the zenith at that position.

The line PQ forms part of the visual horizon at point O and is tangential to the circumference of the Earth.

C is the centre of the Earth and the line CZ is perpendicular the visual horizon.

The line ACB is the celestial horizon which is perpendicular to CZ and therefore horizontal to the visual horizon.

The celestial horizon will cut the circumference of the Earth at latitudes that are 90o to the north and to the south of the observer’s latitude (in this example, latitude 40oN and latitude 40oS).

X is the position of the star X in the celestial sphere and X1 is its geographical position on the Earth’s surface.

Y is the position of the star Y in the celestial sphere and Y1 is its geographical position.

V is the position of planet V in the celestial sphere and V1 is its geographical position.

The diagram shows that although the geographical positions of X and Y are below the visible horizon and therefore out of sight to the observer, the bodies themselves are above the celestial horizon and therefore since they are within the limits for LHA and declination, they will be visible above the horizon at the observer’s assumed position.

The diagram also shows that V would have been above the celestial horizon but for one thing.  Because its LHA is 190o which is greater than 90o but less than 270o, it is outside the LHA limits and therefore will not be above the horizon.

Estimating Approximate Altitude.  This method enables us to calculate the approximate altitude of a celestial body when it lies over the meridian of the observer; in other words when LHA equals 0o or 360o.  When the LHA of a body is greater than 0/360 (i.e. when it is not over the observer’s meridian) adjustments have to be made to the calculated altitude.

Calculating the Altitude of Stars X and Y and planet V at noon.  We can modify the previous diagram to help us with these calculations.

Relevant Data:

Latitude of observer’s assumed position = 50oN

Star X:   Declination = 65oN

Star Y:    Declination = 20oN

Planet V:  Declination = 10oS

XandYapprox altitude

In the diagram, Angle ACN is the angle between the Celestial Horizon and the direction of North and NCX is the angle between the direction of North and the direction of X.  Angle ACX is equal to the sum of these angles and represents the altitude of X which is 85o.

Angle BCE is the angle between the Celestial Horizon and the Celestial Equator and ECY is the angle between the direction of East and the direction of Y.  BCY is equal to the sum of these angles and represents the altitude of Y which is 60o.

Angle BCV is equal to angle BCE minus the declination of V and represents the altitude of planet V which is 30o. However, as discussed earlier, V would not be visible because it is outside the limits for LHA.

 Summary.

Altitude X = 85o

Altitude Y = 60o

Altitude V = 30o

With a little practice, it will become an easy task to estimate the azimuth and altitude of a body without the aid of diagrams.

Calculating altitude when LHA is not zero.  We must remember that the altitudes we have calculated above would apply when the celestial bodies are over the observer’s meridian (i.e. when LHA is 0o).  Therefore, when the LHA is other than 0o, we have to re-calculate the altitude.

The altitude of a celestial body is 0o when it rises at LHA 270o and increases to its maximum when LHA is 360o/ 0o before descending again to 0o when it reaches LHA 90o

Re-calculation of altitude of star X for LHA 22o:

The diagram above shows that the altitude of star X is 85o.

Therefore, Altitude = 85o when LHA = 360o

But Altitude = 0o when LHA = 270o

Thus 90o worth of LHA = 85o of altitude

But LHA = 22o

Therefore, 22o of LHA = (85 / 90) x 22 = 20.7o of altitude.

Therefore, when LHA X = 22o, altitude = 85 o– 20.7o = 64.3o

Therefore Estimated altitude of X when LHA is 22o = 64.3o.

Re-calculation of Altitude of star Y for LHA 80o:

The diagram shows that the altitude of star Y is 60o.

Therefore, Altitude = 60o when LHA = 360o

But Altitude = 0o when LHA = 270o

Therefore 90o worth of LHA = 60o of altitude

But LHA = 280= 80o E.

Therefore 80o of LHA = (60 / 90) x 80 = 53.3o of altitude.

Therefore, when LHA  = 80o, altitude = 60o – 53.3o = 6.7o

Therefore, Estimated altitude of Y when LHA is 80o = 6.7o.

We cannot make a recalculation for planet V because its LHA is outside LHA limits.

Of course we cannot find an accurate solution to a spherical problem with straight-line, two dimensional, drawings such as these which do not take account of phenomena such as refraction and parallax or the fact that the Earth is not a perfect sphere.  However, this method does give us a good idea where to look in the sky for a celestial body that we have selected to use for an accurate position fix.

It is also stressed that the drawings above are for illustrative purposes only, are not drawn to scale and that angles are not accurately drawn.

The procedures for making these calculations are shown in detail in the companion books Astronomy for Astro Navigation and Astro Navigation Demystified.

Posted in astro navigation, Astro Navigation Topics, astronomy, celestial navigation, trigonometry | Tagged , , , | Leave a comment

Jupiter’s Retrograde Motion

Jupiter moves across the sky in a very predictable pattern, but every now and then it reverses direction in the sky, making a tiny loop against the background stars – this is Jupiter in retrograde.

The following diagram shows that, as Jupiter is overtaken by the Earth, its apparent motion across the sky appears to describe a loop as its direction changes from prograde to retrograde and then back to prograde again.

Jupiter loop


At position 1, it appears to be moving from west to east in prograde motion.  At positions 2 and 3, its direction appears to have changed from prograde to retrograde so that it is now moving from east to west.  At position 4, it appears to have resumed prograde motion as it moves from west to east again.

Note.  Sky maps can be very confusing because they are not drawn in the conventional way with east on the right and west on the left.  They are drawn as they would appear in the sky if we were lying down with our legs pointing to the south and looking upwards so that east would be on our left and west on our right.

Jupiter’s retrograde periods last for 4 months and are then followed by   periods of nine months of prograde motion before going retrograde again.  So the time from the beginning of one retrograde movement to the beginning of the next is approximately 13 months.

 The relatively slow movement of Jupiter across the sky makes it very easy for the navigator to locate.  It appears to move from one constellation to another every 13 months describing its retrograde loop as it pauses in each one.

In January 2016, Jupiter will pause in Leo when it goes into retrograde motion and thirteen months later, in February 2017 it will be in Virgo when it begins the sequence again.  After that Jupiter is retrograde in Libra in March 2018 and so on as it follows its path through Scorpio, Sagittarius, Capricorn, Aquarius, Pisces, Aries, Taurus, Gemini, Cancer and back to Leo again.

Jupiter’s predictable path across the sky together with the fact that it is the fourth brightest celestial body in the sky explains why it is such an important navigational planet.

Posted in astro navigation, Astro Navigation Topics, astronomy, celestial navigation, Topics For Schools | Tagged , , | 2 Comments

Finding Stars and Constellations, Part IV

This post continues the series Finding Stars and Constellations.    

Boötes  The Herdsman   If we take a line from Alioth to Alkaid in the Great Bear and extend that line in an -imaginary curve for about roughly three hand-spans as shown in the diagram below, it will point to Arcturus, the brightest star in the constellation Bootes.

bootesBoötes is the 13th largest constellation and is located in the northern hemisphere and can be seen from +90 to -50.  The ancient Greeks visualized it as a herdsman chasing Ursa Major round the North Pole and its name is derived from the Greek for “Herdsman”.

Arcturus is the fourth brightest star in the sky and is a navigation star; it can be seen during nautical twilight in June.  The ancient Greeks named Arcturus the “Bear Watcher”  because it seems to be looking at the Great Bear (Ursa Major).

Corona Borealis, The Northern Cross   If we next take a line from Nekkar to Princepes in Boötes, and extend that line by about one and a half hand-spans, it will point to Nusakan and on to Alphecca in the nearby Corona Borealis constellation.

bootes and corona

Corona Borealis, whose name in latin means northern crown, is a small constellation in the northern hemisphere and can be seen between latitudes +90 to -50. Alphecca, the brightest star in the group, is a navigation star and is best seen during evening nautical twilight in July.

The main stars in Corona Borealis form a semi-circle which is associated with the crown of Ariadne in Greek mythology.  It said that the crown was given to Ariadne by Dionysus on their wedding day and after the wedding, he threw it into the sky where the jewels became stars which were formed into a constellation in the shape of a crown.

Virgo, the Virgin

 virgodrawingThe constellation Virgo takes its name from the Latin for virgin or young maiden.  In ancient Greek mythology, Virgo is associated with the goddess Dike, the goddess of justice and as the diagram below shows, the constellation Libra, the scales of justice, lies next to Virgo.

Virgo lies over the southern hemisphere and is one of the largest constellations in the sky, smaller in size only to  Hydra.  It is visible between latitudes +80 to -80 and for navigation purposes, it is best seen during evening nautical twilight in May.

The brightest star in Virgo is Spica, the 15th. brightest star in the sky and a navigation star.

Finding Virgo.

As we learned when studying the constellation Boötes, an imaginary curved line from Alkaid in the Great Bear leads to the bright orange star Arcturus, in the constellation Boötes.  If, as shown in the following diagram, we continue that curved line by another hand span from Arcturus we will come to the bright bluish-white star Spica, in the constellation Virgo which is to the left of Leo.

beartobootesto virgo and leo

Notes.    Star maps can be very confusing because they are not drawn in the conventional way with east on the right and west on the left.  They are drawn as they would appear in the sky if we were lying down with our legs pointing to the south and looking upwards so that east would be on the left and west on our right.

Although this series of posts show the locations of certain constellations relative to other constellations in the sky, it does not necessarily indicate whether or not they will be visible above the horizon.  That will of course depend on its times of rising and setting at the  position of the observer.  ‘Risings and Settings’ will be the subject of another post.

Watch out for the next post in this series which will be issued shortly.

Links:   

Finding Stars and Constellations Part I

Finding Stars and Constellations Part II

Finding Stars and Constellations Part III

Rising and setting times of stars.

Latitude from Polaris

Astro Navigation Demystified on Amazon

The Application of Mathematics To Astro Navigation on Amazon

About Astro Navigation Demystified


Posted in astro navigation, Astro Navigation Demystified, Astro Navigation Topics, astronomy, celestial navigation | Tagged , , , , | Leave a comment

Calculating Azimuth And Altitude At The Assumed Position By Spherical Trigonometry.

There are several ways of calculating the azimuth and altitude at the assumed position; these include the use of sight reduction methods and software solutions. However, the traditional method is by the use of spherical trigonometry which is demonstrated below.

diag 3 no number

The PZX Triangle


In the diagram above,

PZ is the angular distance from the Celestial North Pole to the zenith of the observer and is equal to 90o – Lat.

PX is the angular distance from the Celestial North Pole to the celestial body and is equal to 90o – Dec.

ZX is the Zenith Distance and is equal to 90o – altitude.

Therefore, altitude is equal to 90o – ZX

The angle ZPX is equal to the Local Hour Angle of the Celestial Body with respect to the observer’s meridian.

The angle PZX is the azimuth of the body with respect to the observer’s meridian.

Summary.

PX = 90o – Dec.

PZ = 90o – Lat.

ZX = 90o – Alt.

Alt = 90o – ZX

<PZX = Azimuth.

<ZPX = Hour angle.

In order to calculate the azimuth and altitude of a celestial body we must solve the triangle PZX in the diagram above.  Specifically, we must calculate the angular distance of side ZX so that we can find the altitude and we must calculate the angle PZX so that we can find the azimuth.

However, because the triangle PZX is on the surface of an imaginary sphere, we cannot solve this triangle by the use of ‘straight line trigonometry’; instead we must resort to the use of ‘spherical trigonometry’ which is explained here.

Examples of the use of spherical trigonometry to calculate the azimuth and altitude of celestial bodies.

Note.  Traditionally, the ‘half-haversine’ formula was used for this task but this formula does not lend itself well to solution by electronic calulator; therefore, the following solutions involve the cosine formula.

Example 1.  Star Sight.

Scenario:     Greenwich date: 30 June 18hrs 05 mins  33 secs

Assumed Position:  Lat. 30oN    Long. 45oW

Selected body: Alioth

SHA: 166

Declination: 56oN

GHA Aries:  250

Step 1.  Calculate LHA

SHA Alioth:   166

Add GHA Aries: 166 + 250 = 416

Subtract Long(W) = 416 – 45 = 371

Subtract 360 = 11

Therefore,  LHA  =  11W

(all results in degrees)

Step 2. Calculate PZ/PX/ZPX

PZ = 90o – 30o = 60o      ∴PZ = 60o

PX=  90o – 56o = 34o     ∴PX = 34o

ZPX = LHA = 11west

Step 3.  Calculate Zenith Distance  (ZX).

As explained here, the formula for calculating side ZX is:

Cos (ZX) =  [Cos(PZ) . Cos(PX)] + [Sin(PZ) . Sin(PX) . Cos(ZPX)]

∴To calculate zenith distance of Alioth:

Cos (ZX) =  [Cos(PZ) . Cos(PX)] + [Sin(PZ) . Sin(PX) . Cos(ZPX)]

=  [Cos(60o) . Cos(34o)] + [Sin(60o) . Sin(34o) . Cos(11o)]

=  [0.5 x 0.829} + [0.866 x 0.559 x 0.982]

=  0.415 + 0.475

Cos (ZX) =  0.89

∴ ZX      =  Cos-1 (0.89)  =  27o

Step 4.  Calculate Altitude.

Altitude  = 90o – ZX   = 90o – 27o  = 63o

Step 5.  Calculate Azimuth (PZX)

As explained here the formula for calculating angle PZX is:

Cos PZX = [Cos(PX) – (Cos(ZX) . Cos(PZ))]  /  [Sin(ZX) . Sin(PZ)]

∴To calculate azimuth of Alioth:

Cos PZX   = [Cos(34) – (Cos(27) . Cos(60))]  /  [Sin(27) . Sin(60)]

= [0.829 – ( 0.89 x 0.5)]  /  [0.454 x 0.866]

=  [0.829 – 0.445] / 0.393

=  0.384   / 0.393   = 0.977

Cos(PZX) = 0.977

∴  PZX   =  Cos-1(0.977)  = 12.31

∴  Azimuth = N12oW (since LHA is west)

In terms of bearing, the azimuth is 348o.

Step 6.  Summarize results.

LHA =  11west

Declination = 56oN

Azimuth at assumed position = N12oW

Altitude at assumed position = 63o

Many thanks to Professor Eric Bittner for his help with this post.

Links:

Spherical Trigonometry

What is Astro Navigation

Accuracy of astro navigation

Relationship between Altitude and Zenith Distance

Planning Star and Planet observations

Azimuth and Altitude

Astro Navigation Demystified

Posted in astro navigation, celestial navigation | Tagged , , , , , | Leave a comment

The Accuracy of Astro / Celestial Navigation

plot 3 U.S. Navy and Royal Navy navigators are taught that the accuracy of astro navigation is ±1 minute of arc or 1 nautical mile and that where position lines are derived from astronomical observations, the resultant position is not known as a ‘fix’ but is known as an observed position and is marked on the chart as ‘Obs’.

A wise navigator will always be aware of the inherent errors in astro navigation and will never consider an observed position to be an absolute position.  An error of  ±1 nautical mile in an observed position in mid-ocean is of little consequence; however, when accurate navigation is necessary such as when approaching land, it can make the difference between life and death.

Errors in Astronomical Position Lines   Errors may be introduced into an astronomical position line by a number of contributory errors which are briefly described below.

Errors in the observed altitude.   Even when the sextant altitude has been corrected for index error, dip, refraction, semi-diameter and parallax, the resultant altitude reading may still be incorrect owing to a combination of other errors such as incorrect calculated values for dip and refraction.

A pronounced error in refraction is likely to occur when the altitude is below 15o.  The dip being affected by refraction is the most likely cause of error; when atmospheric conditions are abnormal, the actual value of dip may differ from the tabulated value by up to 10′.

An error in the observed altitude will lead to an error in the observed zenith distance.

Errors in the calculated altitude.   There are accumulative and unavoidable errors caused by the addition and rounding-off of quantities taken from the almanac.  There are also unavoidable errors in the method by which the zenith distance and hence the altitude are calculated.  These errors vary according to the method being used but generally, the inaccuracies arise because certain quantities are tabulated to the nearest minute and others are rounded-off.

Deck-watch error.  If the deck-watch error is incorrect, the GMT and the local hour angle will be incorrect.  An error in the LHA will lead to an error in the calculated altitude and this will cause the position line to be displaced.

Errors in the D.R. position.  Errors in the course and distance laid down on the chart may result from a combination of inaccurate plotting, compass error. the effects of wind and tidal stream and incorrect calculation of speed made good over the ground.

An error in the DR position and resultant assumed position will lead to errors in the estimated longitude and hence the local hour angle and this in turn will lead to an error in the calculated altitude.

Errors In Observed Positions Derived From More Than One Position Line.  Position lines obtained from three astronomical observations are not likely to pass through a common point.  The reasons for this are firstly, the observations are not likely to be taken simultaneously since it is not possible to take sextant readings of three different celestial bodies at the same instant.  The faster a vessel travels, the greater the movement of the observer between the three observations and the more significant this error becomes even when special methods of calculation such as ‘MOO’ are used.

Secondly, observed altitudes are very seldom correct and therefore, the resultant observed zenith distances will not be correct.  For these reasons, the resultant position lines will be displaced and a ‘cocked hat’ will be formed.

Thirdly, because the position within the triangle of the cocked hat is arrived at by guess-work, it is unlikely to be correct.

For these reasons, observed positions derived from more than one position line cannot be regarded as absolute positions.

Links:

What is Astro Navigation

Relationship between Altitude and Zenith Distance

Planning Star and Planet observations

Azimuth and Altitude

Astro Navigation Demystified

Posted in Uncategorized | Tagged , , , | Leave a comment

Finding Stars and Constellations – Part III

This post continues the series Finding Stars and Constellations.

Lyra, Cygnus and Aquila – The Summer Triangle.

The diagram below shows the constellations Lyra, Cygnus and Aquila.

triangle

If we follow the reference line ‘the Pointers’ from Ursa Major to Polaris, Vega, the brightest star in Lyra, can be found at about one hand-span from Polaris.  An alternative method is to join star 2 of Ursa Major to a point midway between stars 1 and 4 and this line, when extended, will point to Vega.

To the left of Lyra, at about a hand-span and at a slightly lower altitude, we will find the star Altair in the constellation Aquila.  The constellation Cygnus can be found slightly above a point midway between Lyra and Aquila.

The Summer Triangle.  The stars Deneb in the constellation Cygnus, Altair in Aquilla and Vega in Lyra form an astronomical asterism which is known as the ‘Summer Triangle’. The diagram  shows how the triangle is formed by imaginary lines drawn between these stars.   An alternative name given to this asterism by U.S. Air force pilots is the ‘Navigator’s Triangle’ because it’s bright stars provide a beacon in the sky.  The triangle is also popular with ‘seagoing’ navigators because it provides pointers to several constellations.

Sagittarius The Archer   Sagittarius is a large constellation lying over the southern hemisphere and is visible between latitudes +55 and -90.  For navigation purposes, it is best seen during evening nautical twilight in August.  It contains several bright stars, two of which, Nunki and Kaus Australis, are navigation stars.

In ancient Greek mythology, Sagittarius was said to represent the Archer, a beast called a Centaur which was half man and half horse.  In the representation, the Archer has a drawn bow with the arrow pointing to the star Antares, the heart of the scorpion which had been sent to kill Orion.

Finding Sagittarius.  The Summer Triangle provides a useful pointer to Sagittarius.  If we draw an imaginary line from the star Deneb through the star Altair in the Summer Triangle,  and extend that line by about 20o or one hand-span, it will point to the constellation Sagittarius as the diagram below shows.

triangle to sagittarius

Note. Nowadays, the Sun is over the constellation Sagittarius at the Winter Solstice on 21/22 December when the Sun’s declination reaches its southernmost latitude of 23.5o south. However, in ancient Greek times, the Sun passed through the constellation Capricornus at this time hence the reason for naming the latitude  23.5o south the Tropic of Capricorn.

 Scorpius (Scorpio)  The Scorpion   The constellation Scorpius lies above the southern hemisphere and is visible between latitudes +40 to -90.  For navigation purposes, it is best seen during evening nautical twilight in July.

Scorpius has several bright stars which, between them, form the shape of a scorpion.  The brightest star in Scorpius is Antares which is often mistaken for Mars because of its redish orange colour.  Antares is the 16th. brightest star in the sky and is a navigation star.  The second brightest star in Scorpius is Shaula which is said to represent the sting in the tail of the scorpion.  Shaula is also navigation star.

In Greek mythology, Scorpius represents the scorpion that the goddess Artemis sent to sting and kill Orion who had tried to ravish her.

Finding Scorpius.  The legend that the Archer’s arrow in Sagittarius points to the heart of Antares helps us to find and identify Scorpius. The line from Nunki to Kaus Media represents the arrow, the head of which points to Antares in Scorpio which is to the right of Sagittarius.  It also helps to remember that the orange star Kaus Media, points towards the red star Antares .  The bright red glow of Antares further helps us to identify Scorpius. The angular distance from Kaus Australis in Sagittarius to Shaula in Scorpio is approximately 10o  or roughly equivalent to the width of the palm of the hand when held at arms length.

Sagitarius to Scorpio

Notes.    Star maps can be very confusing because they are not drawn in the conventional way with east on the right and west on the left.  They are drawn as they would appear in the sky if we were lying down with our legs pointing to the south and looking upwards so that east would be on the left and west on our right.

Although this series of posts show the locations of certain constellations relative to other constellations in the sky, it does not necessarily indicate whether or not a certain constellation  will be visible above the horizon.  That will of course depend on its times of rising and setting at the  position of the observer.  ‘Risings and Settings’ will be the subject of another post.

Watch out for the next post in this series which will be issued shortly.

Links:   

Astro Navigation Demystified

Finding Stars and Constellations Part I

Finding Stars and Constellations Part II

Rising and setting times of stars.

Latitude from Polaris

Astro Navigation Demystified on Amazon

The Application of Mathematics To Astro Navigation on Amazon

About Astro Navigation Demystified


Posted in Uncategorized | Leave a comment

What’s The Point Of Calculating Our Latitude From The Altitude Of The Sun At Midday?

cover with Jester in useReferring to my earlier post ‘Calculating Latitude from the Midday Altitude of the Sun’, the question has been raised “what is the point of this if you already know your latitude”?  The answer to this question is quite simple, if we are using astro navigation at sea without reliance on GPS, we never know what our exact position is and the midday altitude gives us a handy check on our DR position.

As explained in the link above, to calculate latitude from the midday Sun, we need to know three things: the Sun’s declination, an accurate altitude reading and our approximate latitude.  Armed with this data, we can calculate a reasonably accurate latitude. (Note.  The only reasons that we need to know the approximate latitude is to enable us to know whether it is greater or less than the declination as explained in this link).

 Even in the best circumstances, the accuracy of astro navigation is only ±1 minute of arc or 1 nautical mile.  This level of accuracy may seem to be unacceptable in the light of modern electronic navigation systems such as GPS but before the advent of such systems, astro is all we had to rely upon.  Click here to learn more about the accuracy of astro navigation.

 It might be said “now that we have GPS, what’s the point of an inaccurate method such as astro navigation”?  The answer to that question is that we could lose GPS at any time through a variety of causes such as solar storms, cyber attacks, power failures, system failures, and so on (see my post ‘Could the Global Positioning System Fail’).  On the other hand, the Sun, Moon, stars and planets will always be there and so we will always be able to use astro navigation.

 Furthermore, in certain situations, it might not be advisable to use GPS anyway; just as a mobile phone can give our position away so can a GPS device.  Like all electronic devices, a GPS device emits ‘side-channel electromagnetic signals’and these emissions can be easily detected with modern sophisticated electronic warfare systems.  So for special forces and those in ‘escape and evasion’ scenarios, it might be advisable to find another way of navigating (see my post ‘Astro Navigation in a Survival Situation’

It was not until John Harrison invented the chronometer in the 18th century that navigators had a method of calculating longitude). Before this time, navigators relied on dead reckoning to give them an approximate longitude.  However, they would have been able to calculate their latitude from the midday altitude of the Sun and they would able to use this to revise their DR position. To calculate latitude from the midday Sun, they would need to know two things, their approximate latitude and the declination of the Sun.  They would take their approximate latitude from the DR position and they would have had tables listing the Sun’s declination for each day.  So, the whole point of  knowing the approximate latitude was to enable them to calculate a more accurate one. 

 If we use astro navigation today, we ideally need to be able to take star and planet sightings during  nautical twilight.  If however, the sky is covered during these times, then we have to rely on the Sun and the Moon when they are visible.  In these circumstances, a midday sighting of the Sun is invaluable because not only does it give us our latitude, we can also use it to calculate our longitude as long as we have a chronometer.  When the Sun reaches its highest altitude from our position, we know that it is exactly over our meridian of longitude and so we know that, at that point, it is noon (local time) at our position.  A chronometer will give us GMT, so if we know when it is noon at our position, we can calculate our longitude.  In conclusion, the midday Sun enables us to check our DR position in terms of both latitude and longitude.

Midday Sun in Survival Situations.  In certain circumstances such as survival situations, we would probably not have access to declination tables but there is a ‘rule of thumb’ method which enables us to calculate the approximate declination for any day without having to rely on tables. 

Please note that this method is not very accurate and you are only be likely to use it in a survival situation.  We know what the Sun’s declination will be on four days of the year and with this simple knowledge, we can calculate an approximate value for declination which will help us to calculate our approximate latitude: 

At the Vernal Equinox (March 20/21) and at the Autumnal Equinox (September 22/23)  when the Sun is above the Equator, its declination will be 0o

At the Summer Solstice (June 20/21) when the Sun has reached the northerly limit of its path, its declination will be 23.5o north.

At the Winter Solstice (December 21/22) when the Sun has reached the southerly limit of its path, its declination will be 23.5o south.

Between these dates it moves north or south accordingly at an average rate of approximately 0.35o per day.

Armed with this information, we can calculate the Sun’s approximate declination for any day of the year.

For example, April 15 is 25 days after the Vernal Equinox so the declination on that day will be: 0o plus (25 x 0.35o) north = 8.75o north (approx.).

October 15 is 23 days after the Autumnal Equinox so the declination on that day will be:  0o plus (23 x 0.35o) south  =  8.05o south (approx).

If you check these answers with the Survival Declination Table, you will see that they are accurate to within one degree.

To learn how to calculate your lat and long in a survival situation, go to these links:  Lat from Sun    Lat from Polaris     Long.

To return to the original question, as long as we have an approximate latitude and an approximate declination to work on, we can  calculate our latitude from the midday Sun.  The whole point of doing this is to enable us to check our DR position and revise it if necessary.

Links:

Astro Navigation Demystified

What is Astro Navigation?

Accuracy of Astro Navigation – U.S. Navy

Astro Navigation in a Survival Situation

The Astronomical Position Line

Altitude and Azimuth

Altitude and Zenith Distance

Calculating Latitude from the Midday Sun

Calculating Longitude

Relationship Between Latitude, Longitude  & the Nautical Mile

Dead Reckoning

Lunar Distance

Planning Star and Planet Observations

Posted in Uncategorized | 8 Comments

Finding Stars and Constellations Part II

Continuing the series ‘Finding Stars and Constellations’

combined with andromeda coloured mark 2

Cassiopeia.  This constellation is named after the vain queen Cassiopeia in Greek mythology.

The five stars in the constellation Cassiopeia appear in the celestial sphere in the shape of the letter W and can be observed in the northern hemisphere and down to 20oS.

Star 5 of Cassiopeia can be located along a line of reference from the Pole Star at an angle of 135o to the line of pointers as the diagram above shows.   As Ursa Major revolves around the Pole Star in an anti-clockwise direction, so do the five stars of Cassiopeia but star 5 keeps its position 135o from the line of pointers.  The angular distance of star 5 from the Pole Star is 30o or roughly one and a half hand-spans.

The brightest star in the constellation Cassiopeia  is Alpha Cassiopeiae otherwise known as Schedir which is a navigation star.

 Perseus. This constellation is named after the Greek mythological hero Perseus.

 If a line is drawn from star 3 to star 4 of Cassiopeia, it will point almost directly towards star 3 of the constellation Perseus at about one hand-span as shown in the diagram.

Perseus can be easily seen in the northern hemisphere during the winter months and in the northern areas of the southern hemisphere north of 35oS. during the summer.  Even though Perseus’ stars are bright relative to other constellations, Mirfak is its only navigation star.

Andromeda.  The diagram shows that, if the line from the Pole Star to star 5 of Cassiopeia is extended, it will point to star 3 of Andromeda at about one and a half hand-spans and that a line from the Pole Star through star 1 of Cassiopeia will point to star 1 of Andromeda. The diagram also shows that the 4 primary stars of the constellation Andromeda, when lined up, point to star 1 of Perseus.

The constellation Andromeda is named after Andromeda, the wife of Perseus in Greek Mythology and can be seen in the northern hemisphere and in the southern hemisphere as far south as 40oS.

The brightest star in Andromeda is Alpheratz which is a navigation star.

Watch out for the next post in this series which will be issued shortly.

Links: Finding Stars and Constellations

Rising and setting times of stars.

Latitude from Polaris

Astro Navigation Demystified on Amazon

The Application of Mathematics To Astro Navigation on Amazon

About Astro Navigation Demystified


Posted in Uncategorized | Leave a comment

Finding Stars and Constellations, Part I

Astro Navigation Demystified Full Edition

The usual practice for distinguishing the more conspicuous constellations is to establish reference lines in a known constellation and from these to memorize the directions in which other constellations lie on the celestial sphere. For example, one of the most well known constellations isUrsa Major which is otherwise known by various names such as the Great Bear, the Big Dipper or the Plough.

ursa major

We know that Ursa Major contains a reference line known as the line of pointers.  In the next diagram, you will see that the line joining star 2 to star 1 forms the line of pointers which points to the Pole Star, otherwise known as Polaris.  Polaris is the brightest star in the constellation known as the Little Bear or Little Dipper.

ursa major and minor

Of course, it is not sufficient to know only the direction in which a constellation lies with respect to another constellation; it is also necessary to know the distance.  This presents us with a problem: whereas we measure distances on the surface of the Earth in miles or kilometres, in space these units of measurement have no significance. Instead, to measure distances between objects in space, we use degrees or angular distance as we say.

The following rules provide crude but surprisingly accurate methods of estimating the distance between two bodies:

  • The width of the first finger when held at arm’s length from the body subtends an angle of approximately 1 degree at the eye of the observer.
  • The width of the tips of the first three fingers subtends an angle of roughly 5 degrees.
  • The width of the palm of the hand will subtend an angle of approximately 10 degees.
  • The span of the hand will subtend an angle of roughly 20 degrees.

For example, the angular distance between Star 1 and Star 2  in Ursa Major is 6 degrees or roughly the width of three finger tips when held at arm’s length and the distance between Star 1 and the Pole Star is 28 degrees or roughly three palm widths at arms length.

When the line of pointers in Ursa Major is produced in the opposite direction to the Pole Star, they point to the constellation Leo or the Lion

ursa major to leo

Regulus, star1 and Denebola, star 2, which are the brightest two stars in the constellation Leo are about 25 degrees apart which is roughly a hand span at arm’s length.

The line joining star 4 to star 2 of Ursa Major points to the stars Castor and Pollux which form the eyes of the Heavenly Twins, otherwise known as the constellation Gemini.  Castor, star 1 of Gemini, can be found at 43 degrees (approximately 2 hand spans) from star 2 of Ursa Major.

twins


The Southern Cross,  or Crux, is one of the best known constellations in the southern hemisphere, and is easily recognizable for the cross-shaped asterism formed by its four brightest stars. Crux (Latin for cross) is not visible north of +20° in the northern hemisphere but it is circumpolar south of 34° in the southern hemisphere which means that it never sets below the horizon there.

cross

The cross  has four main stars marking the tips (alpha, beta, gamma and delta).

Alpha Crucis is also known as Acrux (a contraction of ‘alpha’ and ‘Crux’).  This is the brightest star in the constellation Crux.

Beta Crucis, also known as Mimosa or Becrux is the second brightest star in the constellation.

Gamma Crucis or Gacrux, is the third brightest star in Crux.

Delta Crucis or Palida is the fourth star and has variable levels of brightness .

The Pointers.  The constellation Centaurus contains two bright stars: alpha Centauri also known as Rigil Kentaurus and beta Centauri also known as Hadar, which we use as pointers to the Southern Cross.

How to find the direction of south by using the Southern Cross.  There are several methods of doing this but the simplest is as follows

  1. Make an imaginary line between Gacrux and Acrux.
  2. Extend this line from Acrux (the brightest star) for 4.5 times the length of the Southern Cross, as shown in the diagram. This will take you to the position of the South Celestial Pole in the sky.
  3. From the South Celestial Pole, drop a line down to the horizon. Where this line touches the horizon is the direction of south.

pointer

Links: Rising and setting times of stars.

Latitude from Polaris

Astro Navigation Demystified on Amazon

The Application of Mathematics To Astro Navigation on Amazon

About Astro Navigation Demystified

Methods of distinguishing other constellations will be the subject of future posts.

Posted in astro navigation, astronomy, celestial navigation, navigation | Tagged , , , , | Leave a comment

Rising and Setting Times of Stars.

Astro Navigation Demystified Full EditionIt is very useful to be able to calculate the times at which the principal stars and constellations will rise in the east.  It is also helpful to be able to predict the approximate position of the star or constellation in question.  Professional astronomers and navigators have an array of tools such as almanacs, star-globes, computer software and the like at their disposal to help them make their predictions but such tools are not always available to all of us. Fortunately; however, there is a simple way of making these predictions without reliance upon published tables of data and other paraphernalia.

The Earth revolves from west to east about its axis of rotation which is a line joining the north and south poles and if this axis is produced far enough, it would cut the celestial sphere at a point marked by the North Star or Polaris, as shown in the diagram below.   Facing north on the Earth, the Pole Star appears stationary, and the other stars appear to rotate from east to west around the Pole Star although in fact the positions of the stars are fixed and it is the Earth which is revolving from west to east.

pole star


The time taken for a star to complete a circuit around the Pole Star is called a star’s day or sidereal day.  If the sidereal day were to be exactly 24 hours then the stars would rise and set at the same times every day.  However, the Earth completes each rotation about its axis in 23 hours and 56 minutes and so the stars will take the same amount of time to circuit the Pole Star and that is the length of the sidereal day. Therefore, if a star rises in the east at a certain time on a certain day, it will next do so  23 hours and 56 minutes later. In other words, the star in question will rise 4 minutes earlier the next day and this fact gives us the clue to the method of predicting the position and time of star rising and setting times.

Arcturus is the brightest star in the northern celestial hemisphere and so we shall use it for this demonstration.  Whereas the Pole Star is always above the horizon in the northern hemisphere, Acturus which is further south, will be below the horizon for part of its circuit of the Pole Star and so it will rise and set to observers in most parts of Europe and North America.  Whether we wish to observe Arcturus for navigation purposes or for ‘star gazing’ we need to know when it will be above the horizon and so we need to be able to calculate its rising and setting times.

As discussed above, professionals will have access to sets of published tables which tell them the times of rising and setting of all the major stars but we can manage without such tables.  If we note the time of rising of Arcturus on just one day, we can easily calculate the time that it will rise on all following days as the following example shows.

Say that Arcturus rises at 18.00 on a certain day; we know that it will rise again 23 hrs. and 56 mins. later so we can easily calculate that it will rise at 17.56 the next day (4 minutes earlier).  In 30 days time, we can calculate that it will rise 30 x 4 = 120 minutes or 2 hours earlier; that is at 1600.

It is easy to see that if we repeat this process for both rising and setting times for all the stars that we are interested in, we can easily construct our own table of data.

Part 2 of this series (Finding the Positions of Stars and Constellations) will be published in the next post.

Links:   Finding stars and constellations

How to Locate Polaris.

Calculating Latitude from Polaris.

A fuller explanation of this topic is given in ‘Astro Navigation Demystified’

Astro Navigation Demystified on Amazon

web: www.astronavigationdemystified.com

Posted in astro navigation, astronomy, celestial navigation, navigation, Uncategorized | Tagged , , , , , , | Leave a comment