
The ‘Where To Look’ Method. Devised by Jack Case
As discussed in part 1, our aim in, astro navigation, is to calculate the azimuth angle and altitude of a celestial body from our DR position and then to compare the results with the azimuth and altitude accurately measured at our true position. With this information we will then be able to establish a position line from the DR position to the true position. Such a position line is called ‘the intercept’.
So what we need is a method that will enable us to calculate not only which of the navigational stars and planets will be above the celestial horizon during civil and nautical twilight but also what their approximate position in the sky will be during those times. There are various methods and devices that can be used for this purpose such as celestial navigation star-globes, star Identifiers, ABC tables and navigation software systems. However, the ‘Where To Look’ method (WTL Method) solves the problem without the need to clutter the chart table with cumbersome globes, computers and large books of tables, some of which are quite expensive and complicated. It is a particularly advantageous method for use in the close confines of a small-boat chart table and it is cost-free.
It is emphasized that it is not intended to be a method of accurately pin-pointing the position of a star or planet but a simple and quick method of establishing whether or not the body is likely to be visible at the time an observation is required and if so, what its approximate position will be in the sky.
The Method in a Nutshell. Although the following explanation and proof of the WTL method is necessarily quite lengthy, once it is fully understood, it all boils down to the application of this very simple formula: Approx. Alt. = 90o – (Lat ∆ Dec)and the mental image of this very simple diagram:

Demonstration Example. For those who prefer to simply learn and apply a method without bothering to study lengthy explanations and proofs, the following example will adequately demonstration the WTL method. For those who would rather see the proof before deciding whether or not to apply the method, a full explanation is given after the demonstration example.
Brief Demonstration Example. To Estimate The Approximate Azimuth Angle And Altitude Of The Star Alioth by the WTL method.
Scenario: A navigator intends to use the star Alioth for a position fix during morning nautical twilight. Before he can do this, he needs to locate Alioth in the sky. This he does this by using the WTL method to calculate its approximate azimuth angle and altitude as demonstrated below: He bases his calculations on the following data:
DR Position of observer: Lat. 30oN Long. 45oW
SHA of Alioth = 166. Declination = 56oN
GHA Aries = 250
Step 1. Calculate LHA of Alioth.
SHA Alioth 166
GHA Aries 250
. 416
Long -45 (subtract if long is west, add if long is east)
. 371
-360 (subtract 360 if LHA is greater than 360)
LHA Alioth 11 = 11o![]()
Step 2. Calculate whether or not Alioth is above the celestial horizon.
The rules for this are:
Body is above western celestial horizon if: LHA = 0o TO 90o or LHA – 360o = 0o TO 90o
Body is above eastern celestial horizon if: LHA = 270o to 360o or 360o – LHA = 0o TO 90o
Conclusion. The LHA of Alioth is 11oW and so we can conclude that it will be above the celestial horizon to the west.
Step 3. Is Alioth above the celestial horizon to the north and south?
The rules for this are:
Latitude North: visible range = 90oN to (90o – Lat)S.
Latitude South: visible range = 90oS to (90o – Lat)N.
DR Position of observer: Lat. 30oN so the visible ranges are: 90oN to (90o – 30o)S = 90oN to 60oS
Declination of Alioth: 56oN which is within the visible range.
Step 4. Estimate Azimuth Angle. Having calculated the LHA of Alioth, we can now make a rough approximation of its azimuth angle by plotting its LHA and declination in relation to the observer’s DR position using the simple diagram shown earlier. It is necessary to draw this simple diagram in order to explain the method but in practice, the navigator would visualize it in his mind’s eye without the need to draw it.
In the drawing, we have plotted the position of Alioth in terms of its LHA and declination which are as follows: LHA 11oW, Dec. 56oN
If we draw a line joining the position of Alioth to the position of the observer, we will see that the approximate azimuth angle is: N15oW which, in terms of true azimuth, is: 345o

It is reiterated that, in practice, it would not be necessary to draw the diagram; by picturing the diagram in the mind’s eye and visualizing the positions of the observer’s latitude and the declination and LHA of the body, we can easily estimate the approximate azimuth.
Of course, as discussed earlier, we cannot find an accurate solution to a spherical problem with a straight-line, two dimensional drawing such as this which does not take account of the fact that the Earth is not a perfect sphere and does not allow for phenomena such as refraction and parallax . However, at this stage we only need an approximate answer to the question “in what direction do we look”? It is also stressed that the drawing above is for illustrative purposes only and therefore, it is not drawn to scale and angles are not accurately drawn.
Step 5. Calculate Approximate Altitude.
The formula for calculating approximate altitude is: Approx. Alt. = 90o – (Lat ∆ Dec)
Reminder of data gathered to date: Observer’s Lat: 30oN Dec Alioth: 56oN
We can apply the formula to calculate the approximate altitude of Alioth as follows:
Approx alt. Alioth = 90o – (30o ∆ 56o) = 90o – 26o = 64o
Summary of the Demonstration Example Results. Firstly, we used the WTL method to establish that Alioth will be above the observer’s horizon during the predicted times of nautical twilight. Secondly, we used the method to calculate the approximate azimuth and altitude of Alioth as follows: Approx Az. = N15oW (345o), Approx Alt: 64o
Full Explanation of the Method. To find if a star or planet will be above the horizon at our position at the time of the planned observations, we need to take two things into account, its local hour angle and its declination.
Local Hour Angle (LHA). For a star or planet to be visible, its meridian must be within 90o east or west of the observer’s longitude at the time of the planned observations.
- If a body’s LHA is greater than 0o and less than 90o or if LHA is greater than 360o and LHA – 360o is less than 90o then body will be above the western celestial horizon.
- If a body’s LHA is greater than 270o but less than 360o then 360o – LHA will be less than 90o and the body will be above the eastern celestial horizon.
We can formulate the above statements as follows:
Body is above western celestial horizon if: LHA = 0o TO 90o or LHA – 360o = 0o TO 90o
Body is above eastern celestial horizon if: LHA = 270o to 360o or 360o – LHA = 0o TO 90o
The following diagram demonstrates what has been discussed above.
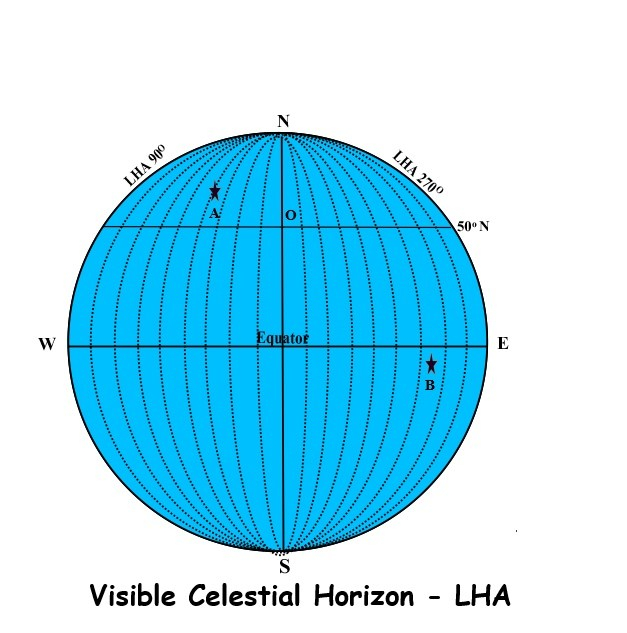
Point O is the position of an observer on the Earth’s surface at latitude 50oN.
NS is the meridian of the observer and in terms of LHA, is 0o.
WE is the celestial equator.
The limits of the observer’s western and eastern celestial horizons are at LHA 90o and LHA 270o which are both 90o from the observer’s meridian.
Suppose that point A in the diagram represents the position of a celestial body whose LHA is 40o and that point B represents the position of another celestial body whose LHA is 295o. Since the LHAs of these bodies is either less than 90o or greater 270o, they will be visible above the celestial horizon to the west and the east respectively.
Bodies whose LHAs are greater than 90o but less than 270o would be below the celestial horizon and therefore would not be visible.
Calculating LHA From the above, we can see that our first step in determining the position of a celestial body is to calculate its LHA.
LHA of A Star. The LHA of stars is not listed in the Nautical Almanac so we must calculate these ourselves. The following method can be used to calculate the LHA of a star.
- From the nautical almanac daily pages, find the Greenwich Hour Angle (GHA) of Aries (to the nearest degree) at the planned time of the observation.
- From the ‘Index to Selected Stars’ in the Nautical Almanac, find the Sidereal Hour Angle (SHA) of the star to the nearest degree. (A list of navigational stars can be found on page 170).
- Calculate your estimated longitude (to the nearest degree) at the planned time of the observation.
- Combine the SHA, GHA Aries and the estimated longitude to find the approximate LHA.
Examples. We will use three celestial bodies, stars X and Y and planet V to demonstrate the method outlined above: DR Position of Observer: Lat : 50oN, Long: 135oW
Details of Star X: SHA = 182 Dec = 65oN
GHA Aries = 335
Longitude of observer = 135oW
To Calculate LHA of Star X
SHA X 182
GHA Aries 335
. 517
Long -135 (subtract if long is west, add if long is east)
. 382
-360 (subtract 360 if LHA is greater than 360)
LHA X = 22o
Since the LHA of star X is between 0o and 90o it will be visible above the horizon to the West. Therefore, LHA = 22oW
Details of Star Y: SHA = 130 Dec = 15oN
GHA Aries = 335
Longitude of observer = 135oW
To Calculate LHA of Star Y
SHA Y 130
GHA Aries 335
. 465
Long -135 (subtract if long is west, add if long is east)
LHA Y = 330o
Since the LHA of Y is between 270o and 360o it will be visible above the celestial horizon to the East. However, from a practical point of view, when the LHA is from 270o to 360o, we need to know how far this is to the east of the observer’s meridian. We do this by subtracting the LHA from 360o which in this case is 360o – 330o = 30oE. Therefore, LHA = 30oE
LHA Of Planet V. Unlike the stars, the positions of the planets in the celestial sphere are not fixed and for this reason the four navigational planets are listed in the daily pages of the Nautical Almanac by their GHA and declination instead of by their SHA. The Navigational planets are: Mars, Saturn, Venus and Jupiter.
The method used to calculate the LHA of a planet is the same as that for a star except that because the GHA is given in the Nautical Almanac, we do not need to calculate it. The following calculations for planet V demonstrate the method.
Details of Planet V: GHA = 354o Dec = 20oS
Longitude of observer = 135oW
To Calculate LHA of Planet V:
GHA 325
Long -135
LHA V = 190
Because the LHA of planet V is greater than 90o but less than 270o it will be below the celestial horizon and therefore it will not be possible to use it for position fixing at the observer’s position.
Azimuth and Azimuth Angle. The difference between azimuth and azimuth angle is demonstrated in the following diagram.

In astro navigation, when we calculate the azimuth of a celestial body, the result is expressed as an azimuth angle. Whereas True Azimuth is measured clockwise from 0o to 360o in relation to true north, azimuth angle is measured from 0o to 180o either westwards or eastwards from either north or south. If the observer is in the northern hemisphere, the azimuth angle is measured from north and if in the southern hemisphere, it is measured from south.
For example, in the diagram above, the true azimuth of an object is shown as 135o but for an observer in the southern hemisphere, the azimuth angle is S45oE. If the observer had been in the northern hemisphere, the azimuth angle would have been N135oE.
Once we have calculated the LHA of stars X and Y, we are in a position to make a rough approximation of their azimuth angles by plotting their LHA and declination in relation to the observer’s DR position on the celestial horizon diagram that we previously used to explain LHA.
In the drawing below, we have added to the LHA diagram by plotting the positions of X and Y in terms of their LHA and declination which are as follows:
Star X: LHA 22o, Dec. 65oN
Star Y: LHA 330o, Dec. 15oN.

If we join the positions of X and Y to the position of the observer, we will see that the approximate azimuth angles are as follows:
Star X: Approximate Azimuth Angle = N30oW which in terms of true azimuth is 330o
Star Y: Approximate Azimuth Angle = N140oE which in terms of true azimuth is 140o
Summary of data relating to stars X and Y which are represented in the diagram:
DR Position of observer: Lat. 50oN Long. 135oW
Star X: Declination = 65oN, LHA = 22o, Approximate Azimuth = 330o
Star Y: Declination = 15oN, LHA = 330o, Approximate Azimuth = 140o
Once you have become familiar with this diagram, there will be no need to draw it every time you wish to calculate the approximate azimuth. By picturing the diagram in the mind’s eye and visualizing the positions of the observer’s latitude and the declination and LHA of the body, it is an easy task to estimate the approximate azimuth.
Of course we cannot find an accurate solution to a spherical problem with a straight-line, two dimensional, drawing such as this which does not take account of phenomena such as refraction and parallax or the fact that the Earth is not a perfect sphere. However, at this stage we only need an approximate answer to the question “in what direction do we look”?
It is stressed that the diagram above is for illustrative purposes only, it is not drawn to scale and angles are not accurate.
Declination. As well as the LHA, we have to take into account the declination of a celestial body. For a celestial body to be visible above the horizon, its declination must be within 90o of the latitude of our position. If our latitude is north, then the declination must be within the range 90o north to (90o – latitude) south. If the latitude is south, then the declination must be within the range 90o south to (90o – latitude) north.
We can formulate the above statements as follows:
Latitude North: visible range = 90oN to (90o – Lat)S.
Latitude South: visible range = 90oS to (90o – Lat)N.
We can explain the reason for this rule with the aid of another diagram which shows the positions of the bodies X and Y from the previous example in terms of their declinations. Please note that the diagram is for illustrative purposes only; for this reason, it is not drawn to scale and angles are not drawn accurately.

In the diagram , O is the position of the observer at latitude 50o North and Z is the zenith at that position.
The line AB represents the observer’s celestial horizon.
The line PQ is horizontal to AB and represents the observer’s visible horizon at point O.
PQ is tangential to the circumference of the Earth at point O.
C is the center of the Earth and the line CZ is perpendicular to both the celestial horizon and the visible horizon.
The celestial horizon at point O will cut the circumference of the Earth at latitudes that are 90o to the north and to the south of the observer’s latitude (in this example, latitude 40oN and latitude 40oS).
X is the position of the star X in the celestial sphere and X1 is its geographical position on the Earth’s surface.
Y is the position of the star Y in the celestial sphere and Y1 is its geographical position.
The diagram shows that although the geographical positions of X and Y are below the visible horizon and therefore out of sight to the observer, the bodies themselves are above the celestial horizon and therefore since they are within the limits for LHA, they will be visible above the horizon at the observer’s position.
Note. Because of the vast distances of the stars from the Earth, we can assume that, in their cases, the celestial horizon and the visible horizon correspond with very little error.
Calculating Approximate Altitude. We can make use of the previous diagram to demonstrate how we calculate the approximate altitude of a celestial body For this demonstration, we will continue with the example of stars X and Y but will ignore V because we have calculated that it will be below the celestial horizon.
Data previously determined:
Latitude of observer’s DR position = 50oN
Star X: Declination = 65oN. Approximate Azimuth = 330o
Star Y: Declination = 15oN. Approximate Azimuth = 140o
Calculating approximate altitude of star X
. In the diagram , Angle, ECZ is equal to 50o, the latitude of the observer.
Angle ECX is equal to 65o, the declination of star X.
Angle BCZ is equal to 90o and is the angle between the celestial horizon and the zenith of the observer.
Angle ZCX is 15o and is the angle between the zenith of the observer and the zenith of star X measured at the Earth’s centre.
Angle ZOX is equal to angle ZCX i.e. 15o.
Angle XOP is the altitude of star X at the observer’s position (that is it is the angle between the visible horizon and star X
Angle ZOP = 90o therefore, angle XOP = 90o – 15o = 75o
So we can conclude that the approximate altitude of star X is 75o
Summary of Data for star X:
Lat of observer: 50oN
Dec = 65oN,
LHA = 22o
Approx. Alt = 75o
Formulating The Method For Calculating The Approximate Altitude.
We can easily see that the approximate altitude is 90o minus the difference between the observer’s latitude and the body’s declination.
We can formulate this as follows:
Approx. Alt. = 90o – (Lat ∆ Dec)
We can apply this formula to the above example as follows:
Approx. Alt = 90o – (50 ∆ 65) = 90o – 15 o = 75 o
We can test the method by using it to calculate the approximate altitude of star Y.
Calculating approximate altitude of star Y. We can confirm the validity of the formula by calculating the approximate altitude of star Y by the same method as above.
Data previously determined for Star Y:
Latitude of observer’s DR position = 50oN
Declination Star Y = 15oN. Approximate Azimuth = 140o
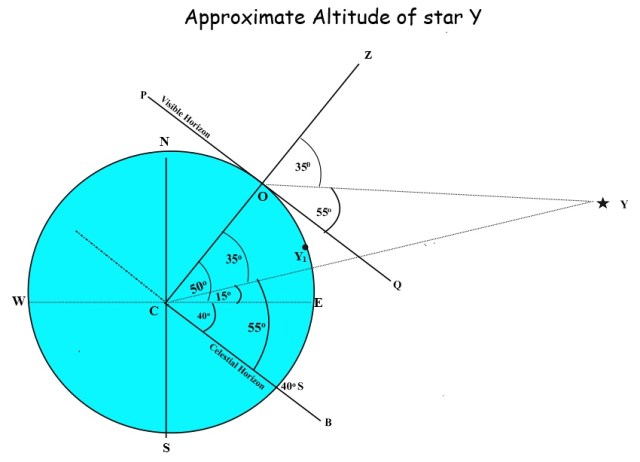
In the diagram, Angle, ECZ is equal to 50o, the latitude of the observer.
Angle ECY is equal to 15o, the declination of star Y.
Angle BCZ is equal to 90o and is the angle between the celestial horizon and the zenith of the observer.
Angle ZCY is 35o and is the angle between the zenith of the observer and the zenith of star Y measured at the Earth’s centre.
Angle ZOY is equal to angle ZCY i.e. 35o.
Angle YOQ is the altitude of star Y at the observer’s position (that is it is the angle between the visible horizon and star Y
Angle ZOQ= 90o therefore, angle YOQ = 90o – 35o = 55o
So we can conclude that the approximate altitude of star Y is 55o and as previously calculated, the approximate azimuth is 150o which puts star to the East of the observer.
Summary of Data for star Y:
Lat of observer: 50oN
Dec = 15oN,
LHA = 330o (30oE)
Approx. Alt = 55o
Testing the Formula for star Y. The formula previously derived for calculating the approximate altitude is: Approx. Alt. = 90o – (Lat ∆ Dec)
If we apply this formula to the data for star Y we have:
Approx. Alt. = 90o – (Lat ∆ Dec) = Approx. Alt. = 90o – (50 ∆ 15) = 90o – 35o = 55o which is the same result that we got from the diagram and so we may conclude that this verifies the formula.
Does the formula work for stars in the opposite hemisphere? In each of the two cases above, the declination of the celestial bodies have been in the same as the latitude of the observer. We now need to see if the formula that we have derived works when the body’s declination is in the opposite hemisphere to the latitude of the observer, that is when the latitude and declination are contrary. To this end, in the example below, we repeat the procedure used in the last two examples to calculate the approximate altitude of star Z which has a declination of 10oS while the observer’s latitude remains at 50oN.
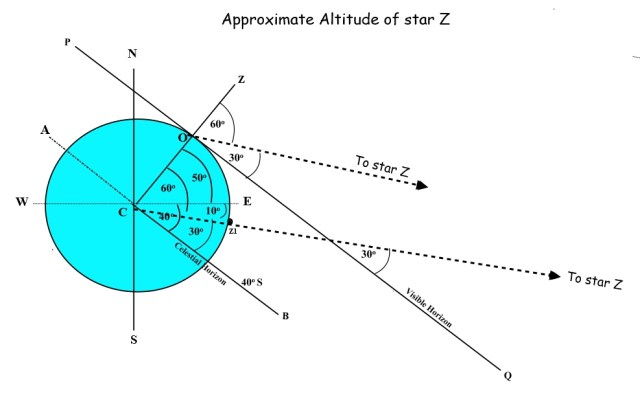 The latitude of the observer is 50oN; therefore, in the diagram, angle, ECZ is equal to 50o. The declination of star Z is 10oS; therefore, measuring from the centre of the Earth, the angle between East and the direction of star Z is 10o. The angle between star Z and the celestial horizon is 30o and the angle between star Z and the visible horizon is also 30o so we can conclude that the approximate altitude of star Z is 30o (see note below) .
Note. Because of the vast distances of the stars from the Earth, we can assume that, in their cases, the celestial horizon and the visible horizon correspond with very little error.
Testing the Formula for star Z.
The formula previously derived for calculating the approximate altitude is Approx. Alt. = 90o – (Lat ∆ Dec). If we apply this formula to the example of star Z we have:
Latitude of observer = 50oN (+50o)
Declination of star Z = 10oS (-10o)
Therefore, Approx Alt = 90o – (+50o ∆ -10o) = 90o – 60o = 30o
The answer agrees with our findings from the diagram so we can conclude that the formula works in cases where the latitude of the observer and the declination of the celestial body are contrary.
Reliability of the Formula when for bodies close to the horizon.
The formula is not reliable for calculating the approximate altitude of celestial bodies whose LHA’s are between 65o and 90o east or west, that is when they are less than 25o above the horizon. There is no great problem here because sextant measurements of bodies which are close to the horizon are not very reliable anyway because pronounced error due to refraction is likely to occur when the altitude is below 20o. particularly during twilight.
Overall Conclusion. The results of the tests above, show that the Where To Look Method could aid the navigator in locating a chosen celestial body’s position in the sky so that accurate measurements of altitude and azimuth can be measured. All the navigator needs to employ the WTL method is to apply the simple formula Approx. Alt. = 90o – (Lat ∆ Dec) and to visualize the simple diagram for calculating approximate azimuth.
Proof of The WTL Method. There is not sufficient space to show the method of testing and proving the ‘Where To Look’ Method in this post; however, for those who may be interested, it is shown in detail in my book ‘Astronomy For Astro Navigation’.
Books of the Astro Navigation Demystified Series:
Applying Mathematics to Astro Navigation
Astronomy for Astro Navigation
Celestial Navigation. Theory and Practice


You must be logged in to post a comment.